How a ‘Dumb Monkey’ Helped One Company Automate Function Testing
Arrowhead Electronic Healthcare has been creating eDiarys on handheld devices since 1999. With the devices, Arrowhead helps pharmaceutical research and marketing organizations document information about how their products are being used in patients’ homes.
Arrowhead’s third-generation eDiary product is called ePRO-LOG. Its primary design goal was to be able to rapidly deploy dairies used for data collection in clinical trails and disease management programs. A typical diary might include 100 forms translated into 15 or more languages, and used in several locales. To handle the large number of software builds and configurations that resulted. the team needed an automated test tool to address potential risks and to automate common tasks.
The most important quality risks we wanted to address were:
- Reliability
- Translation completeness
- Functionality of UI
- Input error checking
- Verification of requirements
The automation tool needed to do the following:
- Address defined risks
- Produce accurate form-flow diagrams
- Reduce tedium and opportunity for error in manual testing
- Save effort associated with manual testing for these risks
- Improve time-to-market by
reducing test cycle duration through 24×7 testing - Provide auditable documentation
- Handle any screen flow or translation without custom test scripts (i.e., be trial-independent)
- Be easy to implement
- Be cost effective
This is a case study in how we reduced our risks and achieved our test automation objectives in just a few months on a total outlay of $0 for tools. Now, it wasn’t as if we started with zero cost as a target. Often, buying tools is the most cost-effective solution, so we evaluated test automation tools as a potential solution. Since we were developing custom software on a hand-held device, we found the commercial options limited. ePRO-LOG is highly configurable and optimized to make diaries easy to produce. The drawback of our approach was that our widgets were non standard, and are therefore not handled gracefully by common testing tools. We also needed an easy way to generate screen flows and compare those with our requirements.
We had hit a dead end. We couldn’t find a commercial tool to meet our needs and human labor was cost prohibitive. That’s when the monkey came into the picture; a Dumb Monkey to be precise.
Why is the Monkey dumb? Because the architecture is so simple. The Monkey is an unscripted automated test tool that provides input at random. To minimize cost, effort, and time required for development, we implemented the Monkey in Perl under Cygwin. We also took advantage of our application’s cross-platform functionality and performed the bulk of our testing on a Windows PC. This allowed us to test more rapidly.
Every test automation tool tends to have its own terminology, so let’s start by introducing some terms, shown in Table 1 (below).
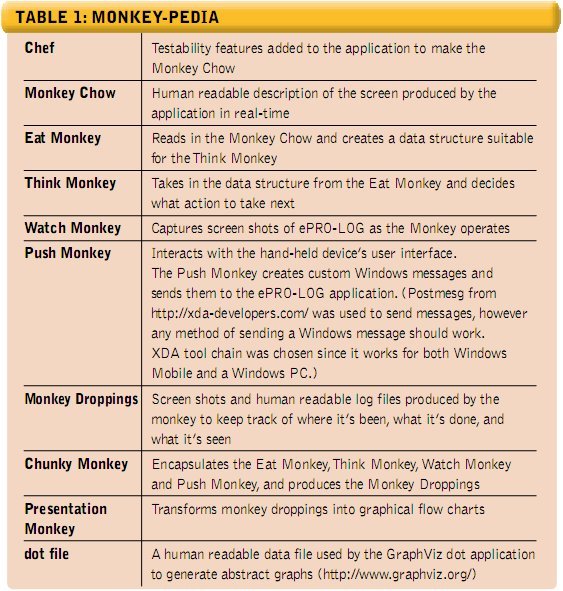
The Monkey’s Talents
The Monkey improves reliability in our application by randomly walking through the diary while trying different input combinations. The use of random events allows the Monkey to be diary-independent and generally does not require any customization (some customization was required to successfully login, otherwise the device would lock us out after too many attempts. Other special situations may also require customization).
During the Monkey’s walk, it is constantly looking for broken links, missing images and input validation errors. The Monkey also can perform long-term reliability tests, which allow us to accumulate as many hours of testing as time and CPU cycles permit. By continuously stressing the application, potential defects are more likely to be discovered.
Such long-term reliability tests are ideal for testing after deployment, and require little human intervention. This allows our products to be continually tested while testing staff focuses on new development.
The Monkey tests more input combinations than a reasonably-sized manual test team could, thus increasing confidence and decreasing the likelihood of undiscovered defects. In addition, the screenshots, Monkey Chow and Monkey Droppings created during the test process are saved in an auditable format. Auditable test results are important in environments that are subject to FDA regulations.
Diaries are typically translated into many languages. For each language, a translation tester must verify all screens. Screenshots captured by the Monkey are automatically inserted into a Word-formatted translation verification document. This document allows translation testers to verify the content and completeness of the screens. This approach is more efficient and less error-prone than navigating to the ePRO-LOG screens manually on a device.
Gifts of the Monkey
While using the Monkey over a four-month period, we noticed significant time savings, mainly in the areas of diary testing, screenshot capturing, and translation verification. We also enjoyed the benefits of long term reliability testing and faster cycle times.
The initial development of the Monkey took approximately 120 hours of a programmer’s time over a three week period. This is an upfront cost and does not have to be repeated for each diary.
The Monkey allows the compression of two calendar days of functional testing into a single half-day. This allows for flexibility and changes during the test period.
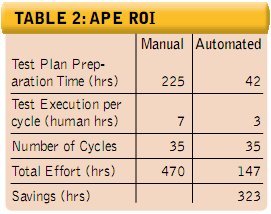
The time saved doing translation verification for a single diary created in 14 different languages was approximately 323 hours (see Table 2, below), obviously surpassing the 120 hours required to develop the Monkey. Since the Monkey is diary independent, our return on investment will continue to grow the more we use the Monkey.
Anatomy of the Monkey
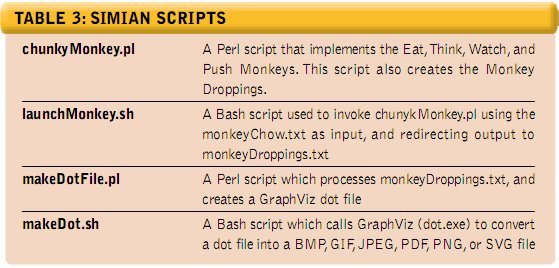
The monkey is a collection of Perl and other scripts (see Table 3, above), open source tools and minor testability enhancements to ePRO-LOG.
Collectively, the ePRO-LOG application and the scripts described in Table 3 (above) implement the system described in Figure 1, below.
FIGURE 1: THE MONKEY’S BUSINESS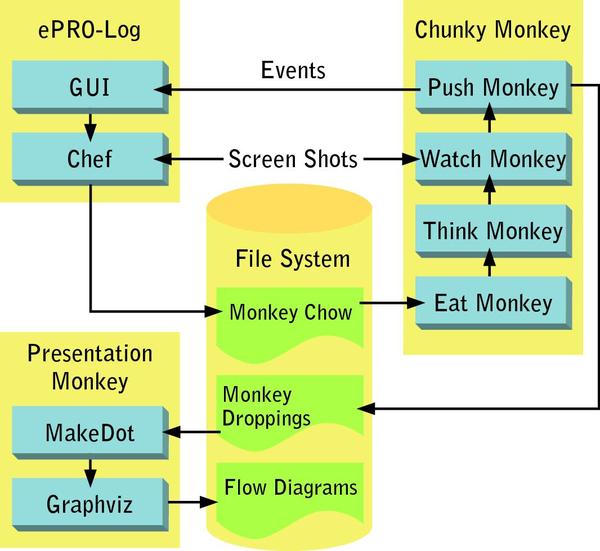
Let’s take a look at examples of the three main types of documents that make up the Monkey’s anatomy.
Monkey Chow describes the form and all of the widgets belonging to the form. Figure 2 (below) shows some examples of Monkey Chow corresponding to FormHome. White space was added to make the data more readable.
FIGURE 2: THE MONKEY’S GUTS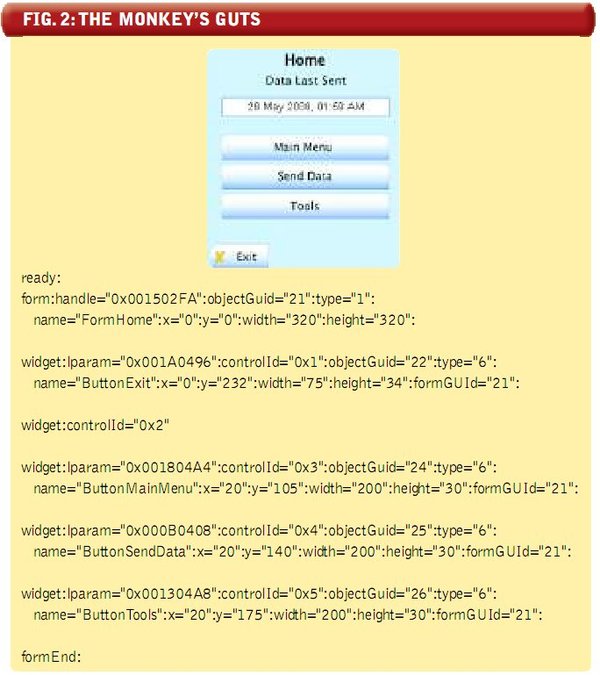
To use this data to hit ButtonTools, we would pass in the form handle=
“0×001502FA”, lparam=“0×001304A8”, and controlId=“0×5” to the Push Monkey. Additional data is used to provide insight to the Think Monkey and to make the Monkey Droppings more descriptive.
The subroutine in Listing 1 (below) was extracted from the Push monkey. The print statement at the end will become a single entry in the Monkey Droppings.
LISTING 1
bq.
bq. sub hitGraphicButton
{
 my $formContainer = shift;
 my $widgetParams = shift;
 my $handle = $formContainer->{"params"}->{"handle"};#	 form:handle="0x001502FA":
 my $message= "0x000111"; 	#		WM_COMMAND message
 my $wParam = $widgetParams->{"controlId"};
	# controlId="0x5"
 my $lParam = $widgetParams->{"lparam"}; 	#		lparam="0x001304A8":
 my $result = `postmsg.exe -p -h $handle $message $wParam $lParam`;
 print "event" .
 ':name="'.$formContainer->{"params"}->{"name"} .'"'.
 ':type="'.'GraphicButton'.'"'.':name="'.$widgetParams->{"name"}.""n";
 #
event:name="FormHome":type="GraphicButton":
	name="ButtonTools"
}
Monkey Droppings record the output from the Chunky Monkey. The output consists of the current form, whether a screen shot was taken, and any actions taken by the Think Monkey. In the example in Listing 2 (below), we started on the login screen, pressed Button1 four times, hit ButtonOkay, then selected ButtonTools on FormHome. Screens shot where also taken along the way.
SIDEBAR: LISTING 2
Storing image as: ../images/FormLogin.png
event::name="FormLogin":type="GraphicButton":
name="Button1"
event::name="FormLogin":type="GraphicButton":
name="Button1"
event::name="FormLogin":type="GraphicButton":
name="Button1"
event::name="FormLogin":type="GraphicButton":
name="Button1"
event::name="FormLogin":type="GraphicButton":
name="ButtonOkay"
Storing image as: ../images/FormHome.png
event::name="FormHome":type="GraphicButton":
name="ButtonTools"
Storing image as: ../images/FormTools.png
This data can also be used to create a dot file for the Presentation Monkey. FormTools was added to the dot file for purpose of illustration. Listing 3 (below) shows a sample GraphViz dot file.
SIDEBAR: LISTING 3
digraph studyFlow
{
 FormLogin [label = "", shapefile = "images/FormLogin.png"];
 FormHome [label = "", shapefile = "images/FormHome.png"];
 FormTools [label = "", shapefile = "images/FormTools.png"];
 FormLogin -> FormTools;
 FormLogin -> FormHome;
}
Figure 3 (below) displays the result of Presentation Monkey using GraphViz to render the dot file into a screen flow image.
FIGURE 3: THE MONKEY SHINES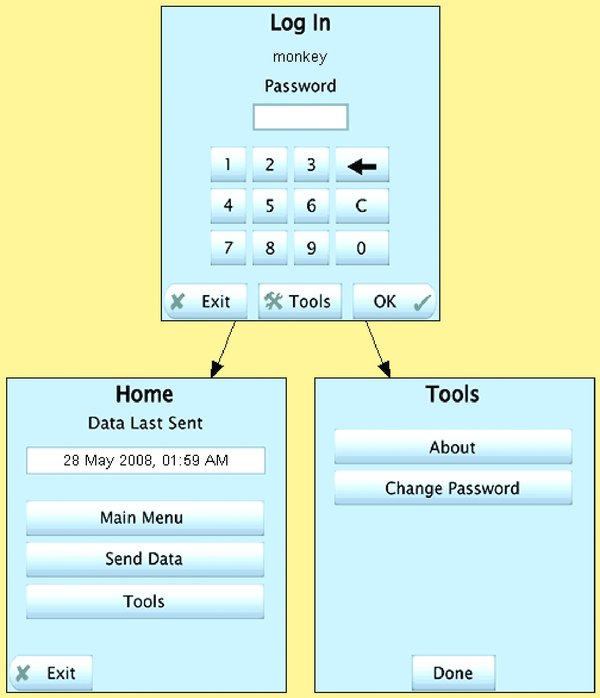
The Monkey’s Hidden Powers
The monkey has a latent capability that we have not yet used—the ability to verify the actual screen flows against the requirements specification. This is particularly important in an FDA-regulated environment where complete coverage of requirements are mandated by 21 CFR and other regulations. For companies that are operating in regulated environment, maintaining the required level of documentation can be a significant operating cost.
Figure 4 (below) shows a comparison of specifications with screens and test screen flow. Let’s work our way around this figure, starting with the sequence originating on the right side.
FIGURE 4: CHIMP CHOICES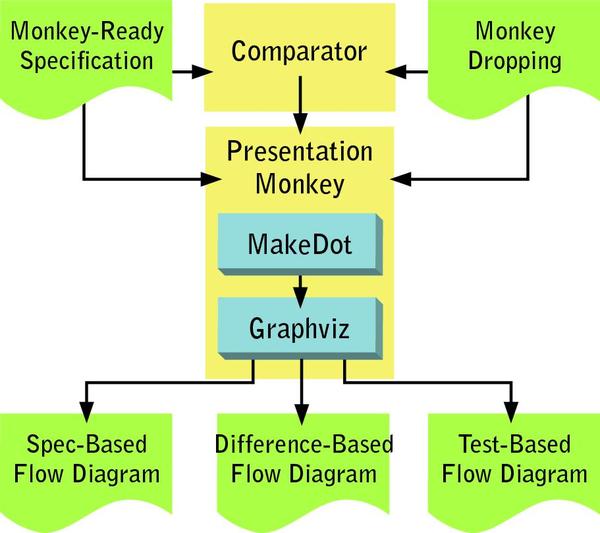
The Presentation Monkey can produce a screen flow diagram from the Monkey Droppings file as shown previously in Figure 3. This diagram shows what screens where observed during Monkey testing.
However, we can also produce a screen flow diagram using our requirements specification instead of the Monkey Droppings file. Our testers can use this diagram to show the expected functional flow of the application.
Now, that capability alone would be exciting enough, but would still leave the tedious and error prone task of comparing the two screen flows. However, we also have a comparator that can compare the test-based screen flow with the spec-based screen flow. The output is fed to the Presentation Monkey, which produces a comparison like that shown in Figure 5 (below).
FIGURE 5: PRIMATE PATHS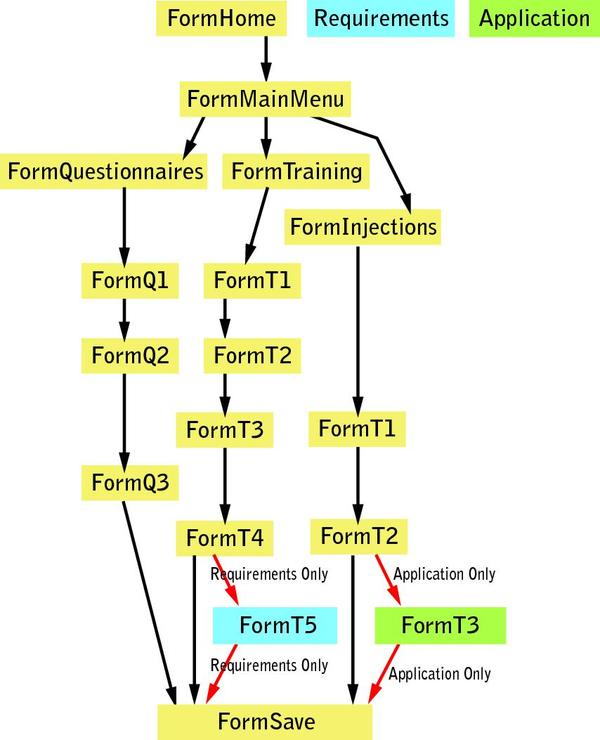
Figure 5 highlights the differences between the screen flow described in the specification and what was observed during testing. For example, the requirements specification called for the screen flow to proceed from FormT4 to FormT5 prior to entering FormSave, but instead we went straight from FormT4 to FormSave. In addition, the requirements specification called for the screen flow to proceed from FormI2 directly to FormSave, but instead we went from FormI2 to FormI3 before proceeding to FormSave. This capability greatly reduces the risk of releasing a product which does not adhere to customer requirements.
What’s Next for the Monkey?
We plan to scale our usage of Monkey labor to perform long term software reliability testing. By using a large number of PCs or a Monkey cloud, we could simulate tens or even hundreds of thousands of hours of operation in as little as a week. This will allow us to produce statistically valid software reliability estimates for the ePRO-LOG.
We also intend to introduce scripting capabilities into the Monkey. This will allow for a pre-determined decision about screen flows (rather than a random decision) during scripted tests.
Creating a Monkey with simple architecture allowed us to address our risks while saving time and money. Using open source components and minimal software development effort, we created a custom testing application that provides far greater benefits than existing commercial products. The Monkey has already paid for itself many times over in time saved, and gives the company a competitive advantage by improving our documentation and testing, and allowing for faster turnaround time.
Also, it should be noted that no monkeys were harmed during the development of this application.
About the Author
 Rex Black – President and Principal Consultant of RBCS, Inc
With a quarter-century of software and systems engineering experience, Rex specializes in working with clients to ensure complete satisfaction and positive ROI. He is a prolific author, and his popular book, Managing the Testing Process, has sold over 25,000 copies around the world, including Japanese, Chinese, and Indian releases. Rex has also written three other books on testing – Critical Testing Processes, Foundations of Software Testing, and Pragmatic Software Testing – which have also sold thousands of copies, including Hebrew, Indian, Japanese and Russian editions. In addition, he has written numerous articles and papers and has presented at hundreds of conferences and workshops around the world. Rex is the immediate past president of the International Software Testing Qualifications Board and the American Software Testing Qualifications Board.