Don’t Let Overload Put Your Company’s Name on The Front Page
Load testing should be an integral part of any quality process. Unlike functional testing, which ensures that applications perform as expected in terms of functional requirements, load and performance testing determine whether an application is able to survive the heavy load of users in the real world.
Not long ago, Gmail, Google’s email platform, was down for few minutes. It was front page news in some newspapers. Imagine Google trying to sustain the load of millions of users without load testing in advance of deployment.
There’s a lot at stake for many companies to ensure that users don’t see a “Page cannot be displayed” because the server is unavailable. Even more important is to closely analyze the results and take corrective actions as necessary.
This article builds on a previous work (Software Test & Performance May, 2008), which detailed real-time load test scenarios to determine scalability in peak usage times. Continuing along those lines, this article covers issues dealing with activities after the performance tests are completed. It answers questions such as:
- What statistics should be monitored during the load tests?
- How should the metrics be collected and analyzed?
- What recommendations can be made to the development team to fine tune the application?
Put more simply, the questions require that we address three major topics:
- Monitoring
- Analysis
- Tuning
The terms are defined as follows:
1) Monitoring
A load test result contains performance counter samples and error information collected periodically from the computers under test. A large number of performance counter samples can be collected over the course of a load test run. The amount of performance data collected depends on the length of the run, the sampling interval, the number of computers under test and the number of counters to collect. For a large load test, the amount of performance data collected can easily be several gigabytes. While a test is in progress, a condensed version of the performance metrics can be observed using various graphs. This process is termed monitoring and the results are referred to as in-progress.
2) Analysis
By default, the test controller spools all collected load-test sample data to a database while the test is running. Additional data, such as timing and error details, are loaded into the database when the test completes. The performance data for a completed test can be loaded from the database and analyzed by an analysis tool. A completed test result loaded from a load test result database is also called a post-run result.
3) Tuning
Once results have been analyzed, the load test engineer, in collaboration with development team, recommends some measures to fine tune the application. The tuning recommendations can be with respect to application servers, Web servers, Java applications or the JVM, the database, or a combination. This step narrows down the specific area that is believed to be a major obstacle and follows the steps iteratively until the application is performing as expected.
For the three steps above, some knowledge of testing tools and analytical abilities are necessary. For the purposes of this article, HP LoadRunner was used for load testing, and Java monitoring was performed by Quest Performasure. I’ve kept the concepts described here as general as possible so they should apply to other tools in most cases.
Performance Monitoring
The first step in analyzing performance results is to set up the monitoring components (see Figure 1, below). Online monitoring of metrics during a test run provides a picture of how the test is going and lets you decide whether it makes sense to continue based on early metrics.
There are 3 steps involved in a monitoring setup:
1. Configure Servers
This step involves installing required components on server machines to enable collection of metrics during the performance test run.
For example: To monitor metrics such as average load, collision rate, context switch rate, CPU utilization, incoming packets error rate on a UNIX server, the rstatd daemon must be configured on the machine or machines to be tested. Without the rstatd daemon, it may not be possible to collect the desired metrics using LoadRunner.
2. Configure Controller Machine
The controller governs the test run. It is from here that you control your test scenarios. The controller’s two main purposes are:
- To verify that server machines have been correctly configured
- To add the desired measurements to the list of metrics to be collected
c) Configure Generator Machine
The Load Generator is a machine that runs virtual users; the software responsible for simulating user activity. During the test, the controller transfers information about the desired load and metrics to be collected to the load generator, which generates the load and stores the results. When the test is done, results data is transferred to the controller, which can then perform an analysis. If you’re having trouble linking these machines, see sidebar: “Don’t Wind It, Ping It.”
Real-time Monitoring
Once you’ve completed the set-up, the next task is to start running tests. Performance monitoring tools give you options to monitor the metrics of interest during the test run. However, tools vary as to how many graphs can be displayed at one time.
There are some people who believe that if the same information is available after the test run is complete, there’s no need to waste time looking at the monitors during the test run. But there are certain benefits to real-time monitoring during the test run, such as:
- Identify errors early. Using online monitors can help testers to gauge the results of a test run early in the process. For example: in one test run I performed recently, I started seeing errors as soon as the tests began. Looking at the server logs, we discovered that the there were code deployment issues and that running the tests would be of no use until those issues were fixed. Having that information from the monitors helped us identify an error long before the test run had completed, enabling the development team to begin work that much more quickly.
- Gauge testing results: With the metrics display on the monitors, we can with relative certainty gauge how the test would proceed. For example: having a look at a response-time curve during the first half of the test could enable us to make a decision to stop the test and run a modified scenario and save time.
Performance Analysis
During load test scenario execution, virtual users generate result data as they perform their activities. To monitor the scenario performance during test execution, we use the online monitoring tools described in the previous section. To view a summary of the results after test execution, we use analysis tools. Analysis tools provide in-depth reports and graphs, presenting information that teams need to evaluate the performance of their applications under test. There are also lots of customizations available to get the statistics one wants to find problematic areas.
Performance testing, without proper analysis, is useless. A careful inspection of the data can reveal performance problems and often leads to other troubleshooting steps. Let’s look at couple of examples to better demonstrate this.
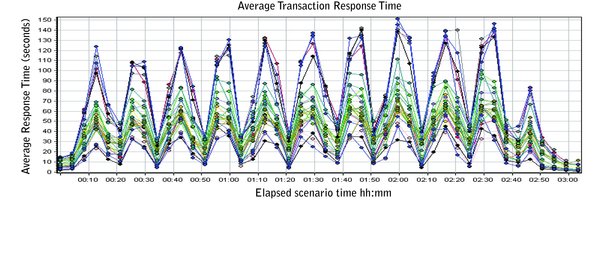
The graph in Figure 1 shows average response times for a sample test run. As can be immediately seen, the graph shows multiple peaks and troughs during the test run. The sharp peaks and valleys indicate a problem sometimes known as a performance leak. This means that a resource is in short supply, causing virtual users to wait until the resource is available and hence the increased response times (shown as highs in the graph). When the resource becomes available, response times returned to normal (seen as lows).
Figure 2 (below) shows that during the end of a scenario run, we see very high response times. One conclusion might be that as the number of users increases, so too does contention for resources such as Web server and database connections hence the slower performance. This would point to an inspection of server configurations such as the connection pool, thread configuration and memory allocation and usage.
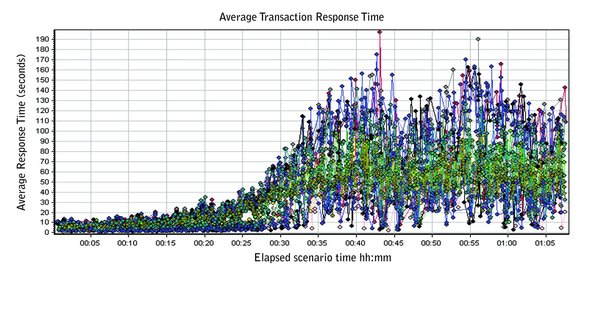
However, it is sometimes risky to draw conclusions by looking at these graphs in isolation. It’s best to merge graphs from multiple test scenarios in an effort to reveal as much information as possible. For example, merging an “Average Response Time” graph with a “Running Users” graph can reveal information on whether there is a direct correlation between response time and the number of users connected to the system.
Performance Tuning
Once you have monitored and analyzed the performance test results, the next step is to drill further into the specifics and find the exact cause of performance bottlenecks. Most of the time, the analysis graphs provide enough information into problem areas, but developers would usually require more specific information than you might be able to provide using just these tools. I remember providing analysis graphs to one of the developers in my team and getting back a reply: “These static graphs don’t help me. I would rather have more specifics or information on the server logs”.
There are several tools available that can help to drill down into the stack and provide more specific information for methods and database activities. These include Wily Introscope, Quest Performasure, and IBM ITCAM.
Here are some of the parameters that need a closer look at. We will consider a Java application for the purposes of this example.
a) Heap Memory
A heap memory pool is an internal memory pool created at start-up that tasks use to dynamically allocate memory as needed. An optimal heap memory ensures that processes can execute as expected without memory becoming a cause of contention.
Figure 3 (below) contains a sample graph showing heap usage as 256.9 MB. Maximum heap size in this case was 256 MB, a bit close for comfort. For optimal performance, heap memory should be increased so it doesn’t become a bottleneck.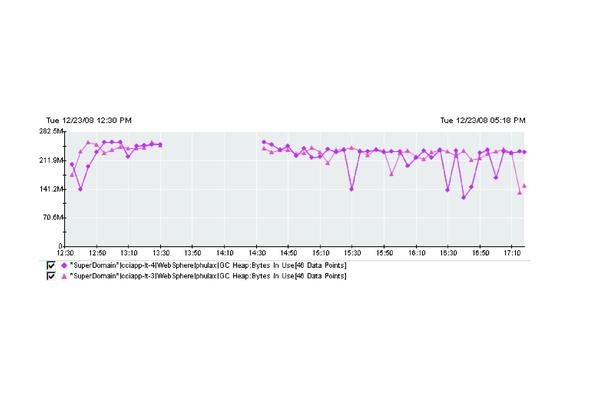
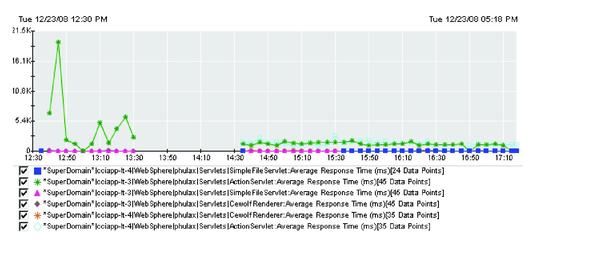
b) Component Level Details
One of the biggest advantages of a performance monitoring and tuning tool is the detail it provides. Some of the Java components that are commonly used are servlets and Java Server Pages (JSPs). It can be helpful to know which component is the bottleneck in the application. For example: the graph in Figure 4 (below) shows which servlet exhibits the longest response times compared with others. So, with this information a developer can specifically look into the slowest servlet instead of guessing or spending time troubleshooting other components.
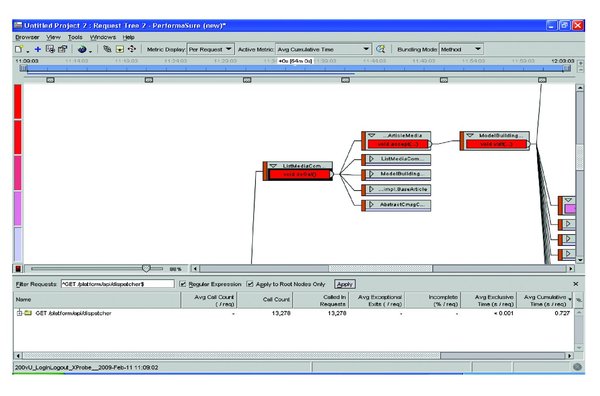
Let’s look at the step by step process of how to drill down to “method level” details using Quest Performasure. Remember, though process can differ a little among various tools, basics never change.
Step 1: Open the desired recorded Performasure session for analysis. The default view of Performasure is the “Request Time” browser. This view shows you all the top requests sorted by response time. Among these requests is the tier (application or database) where these requests spent most of their time.
Step 2: Knowing this, drill in to see the appropriate team to assist, which in this case is the application or database team.
Step 3: Once you know which request is most expensive (timewise), next you can opt to view more information about it in the “Request Tree” browser. This view shows a call tree of all classes and methods corresponding to the request you identified.
Step 4: Then drill down a little further and find which method among all the methods shown in “Request Tree” browser needs to be looked at. Since a request might call a lot of methods, it’s helpful to find few methods for us to look in. You can use various features to drill down to the most expensive method.
Repeat these steps to prune the next most expensive method and so on.
In Figure 5 (below), the upper pane displays all the methods related to a particular GET request displayed in the bottom pane. Also, one of the methods in the upper pane is surrounded by dark black lines. This method was found to be most expensive with respect to “Average Cumulative Time” (displayed in top of graph as “Active Metric”).
c) Basic UNIX commands
A general understanding of basic UNIX commands can come in handy when troubleshooting and analyzing server logs. Some of commands I have found useful are:
- Top?Displays top CPU processes
- PS? Report processes status
- Tail? Prints the last few lines of a file, which is handy for checking log files
It is also useful to have a detailed knowledge of Java threads. In many cases, taking thread dumps can be helpful in identifying exactly what is going on in the application when a bottleneck arises.
Load and performance testing must be carefully controlled processes. Perhaps more critical than the test themselves is the analysis performed of the data gathered post-test and the actions taken as a result. It is among the last and most critical steps in the QA cycle before the product rolls out to the real world, and it could be your last best hope for preventing a PR Katrina. Because it’s always better to find issues yourself than to let your customers find them for you, or worse yet, to read about them in the morning paper.
DON’T WING IT, PING IT
The machine you set up as your controller also will be told what performance metrics are important to you. But when it comes time to test, the controller hands this information over to the load generator(s), which simulate user activity and collect data based on your metrics. When testing’s done, they send results back to the controller for analysis. Obviously, communication between the controller and generator machines is critical. If this is a problem, here are a couple of very basic troubleshooting steps you might try:
* Use the “ping” command from either machine to the other to make sure they can see each other.
bq. * Check that the LoadRunner agent process is running on generator machine. It is this agent process that handles all communication between controller and generator.
Before running your main test, I recommended running a short test first, just to make sure everything is working properly.
About the Author
Prakash Sodhani PRAKASH SODHANI is a senior performance test engineer, driving performance testing and troubleshooting for large scale and high impact applications. He has more than 6 years of experience with positions ranging from test engineer to QA lead. He holds a M.S. degree in Computer Science from Clemson University. He is CSTE, CQIA, CCNA, SCJP, MCP (SQL Server C#), HP QTP, HP Quality Center, and Six Sigma certified. Prakash has multiple papers on quality and testing in Software Test and Performance magazine, ASQ, Seapine, Automated QA, and Stickyminds.